Webflow analytics: what's built in and how to add more (2026 guide)
Webflow's built-in analytics are basic: you get light traffic counts but not traffic sources, device breakdowns, or conversion tracking tied to where visitors came from. Webflow does capture form submissions natively. To see the full picture, add a dedicated analytics tool through Webflow's custom code (the Head field in Site Settings), which requires a paid Site plan. Cookieless, privacy-friendly tools are the easiest fit because they install in one line and need no consent banner.
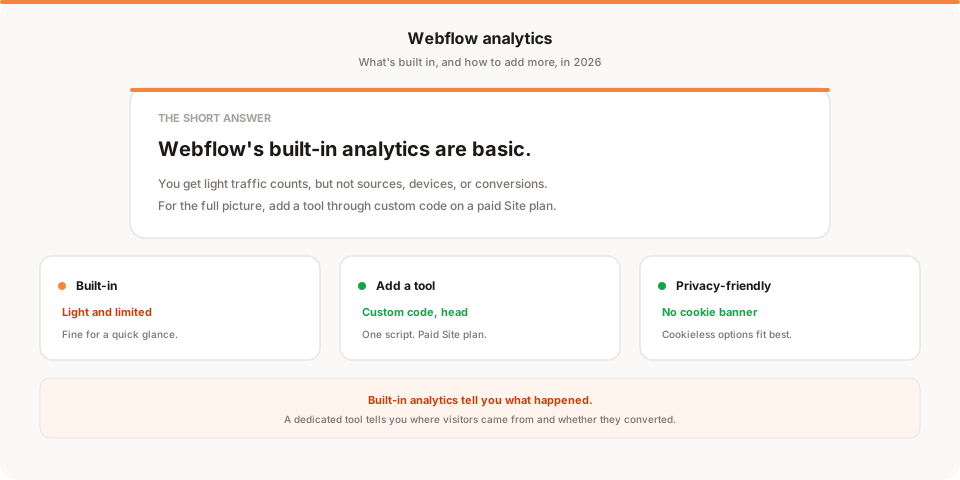
Short answer: Webflow's built-in analytics are basic, so if you've built a real site on Webflow and want to know where your visitors come from or whether they convert, you'll need to add a proper analytics tool. The way to do it is through Webflow's custom code (the Head field in Site Settings), which takes about two minutes on a paid Site plan. This guide covers what Webflow tracks natively, where it stops, and exactly how to add more.
Webflow is a genuinely powerful way to build and ship a site without hand-coding it. The one place people consistently hit a wall is analytics: you launch something you're proud of, share it, and then realize you can see almost nothing about who showed up or what they did. Let's fix that.
Quick disclosure: I'm the founder of Muro, a privacy-friendly analytics tool, so I have a stake in this topic. I've written this as a genuine how-to that works with any analytics tool, and saved my own product for one honest mention near the end.
Does Webflow have analytics?
Yes, but "basic" is the honest word, and the details shift over time as Webflow expands its own tools.
Out of the box, Webflow gives you light traffic information and, usefully, captures form submissions natively, so leads from your contact and signup forms land in your project without any setup. Webflow has also been building out first-party analytics options that go beyond the old basics. Those are genuinely handy for a quick pulse check.
What the built-in experience still doesn't reliably give you is the set of questions that actually help you grow: where your visitors came from, how they moved through your site, which pages pull their weight, and which sources sent people who converted rather than just bounced. For that level of detail, you add a dedicated analytics tool, and Webflow makes that straightforward.
What the built-in analytics leave out
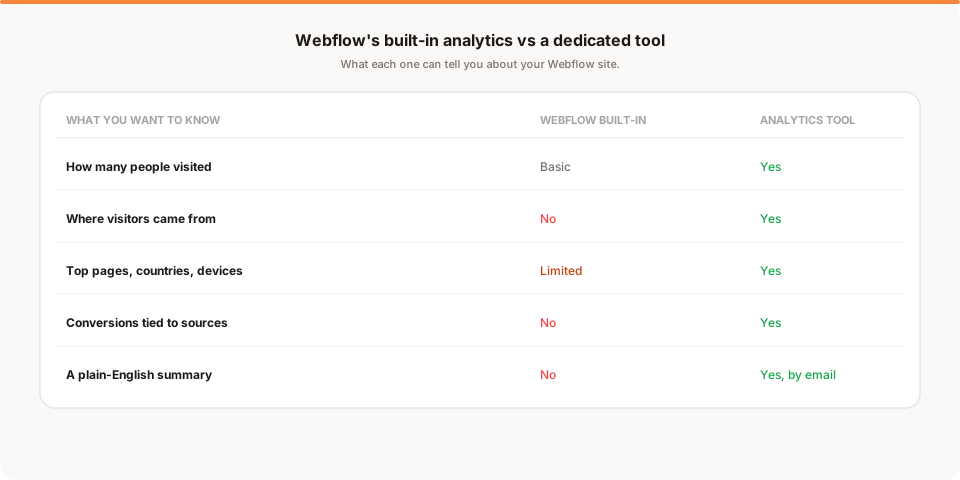
Here's the specific gap, stated plainly. Webflow can tell you that traffic happened. It's much weaker at telling you how it was found and what happened next.
You can't easily see whether a visitor arrived from Google, a newsletter, a tweet, or a paid ad. You can't segment by country or device to check that your mobile experience holds up. You can't follow the path someone took from a blog post to your pricing page to a signup. And you can't tie a form submission back to the campaign that produced it. For a simple brochure site, none of that matters. For a Webflow site you're using to grow something, all of it does.
How to add analytics to your Webflow site
The reliable way to get real analytics on a Webflow site is to add a tracking script through custom code. Here's the honest version of how that works.
The mechanism is Webflow's Custom Code area, and adding site-wide code requires a paid Site plan. The free Starter plan doesn't let you add custom code to the published site, so if you're on Starter you'll either upgrade or stay with Webflow's built-in options.
If you're on a paid Site plan, adding a tool takes about two minutes:
- Copy the tracking snippet from your analytics tool of choice.
- In Webflow, open Site Settings, then Custom Code.
- Paste the snippet into the Head Code field.
- Save and publish your site. The tool starts collecting on the next page load.
That's it, and it covers every page on the site, not just one. This is exactly how you'd add Google Analytics, and it's how you'd add a privacy-friendly tool like Plausible, Fathom, or Muro. Webflow also has a dedicated Google Analytics field in its integrations settings if you specifically want GA, but the custom-code route works for any tool and is the one to know.
Google Analytics or a privacy-friendly tool?
Once you can add any script, the real question is which one. The two paths are Google Analytics or a cookieless, privacy-friendly tool, and they lead to very different experiences.
Google Analytics is free and powerful, but it uses cookies and generally requires a cookie consent banner in the EU, which adds friction to a clean Webflow site and quietly loses you the data of everyone who rejects the banner. Privacy-friendly tools take the opposite approach: no cookies, no personal data, and in most contexts no consent banner. On a site you designed to look polished, bolting on a cookie banner feels especially clunky, which is a big reason Webflow users lean toward the cookieless options. If you want the full rundown of that category, I compared them in the best privacy-friendly analytics tools for 2026, and if you're weighing whether to leave Google's tool entirely, the best Google Analytics alternatives covers that decision.
What real analytics tell you that Webflow doesn't
Once a dedicated tool is installed, the picture changes from a bare visit count to the things that actually inform decisions.
- Traffic sources. Whether people came from search, social, a newsletter, or an ad. This is the single most useful thing Webflow's built-in view can't give you, because it's how you learn what's working.
- Top pages. Which parts of your Webflow site earn the most attention, so you know what to expand and what to cut.
- Countries and devices. Where your audience is and whether your mobile layout is quietly losing people.
- Conversions by source. Whether the visitors from a given channel actually signed up or submitted a form, not just visited.
That last one is the difference between a site you hope is working and one you know is working.
Tracking form submissions and conversions
This deserves its own note, because Webflow handles part of it and leaves part to you.
Webflow captures form submissions natively, so the raw leads are already there. What the native data doesn't do is connect a submission to the traffic source that produced it. To close that loop, send people to a dedicated thank-you page after they submit, using Webflow's form success state or a redirect, and then count views of that thank-you page as a conversion in your analytics tool. Now a signup isn't just a lead in a list, it's a conversion you can trace back to the channel that drove it, which is what lets you double down on what works.
Why your Webflow numbers won't match Google Analytics
If you run a dedicated tool alongside anything else, expect the numbers to disagree, sometimes by a lot. That's normal, and worth understanding so you don't waste an afternoon hunting for a bug that isn't there.
Different tools count differently. Google Analytics leans on cookies and its own session logic, and in the EU it loses a chunk of data whenever a visitor rejects the cookie banner, because it isn't allowed to run until they agree. Cookieless tools count everyone by default, so they often report higher visitor numbers than GA, not lower. Webflow's own basic counts use yet another method again.
So a 10 to 30 percent gap between any two of them is common, and none is lying. They're answering a slightly different question with a slightly different method. The move is to pick one tool as your source of truth and watch the trend inside it, rather than trying to reconcile exact numbers across three sources. The direction of change matters far more than the second decimal place.
How Muro fits with Webflow
Softly and honestly: Muro is one of the privacy-friendly tools you can add to a Webflow site through custom code, and it's built for people who don't want to log into a dashboard to know how their site is doing.
Once the script is in your Webflow Head Code, Muro uses no cookies and, in most contexts, needs no consent banner. Instead of leaving the numbers for you to check, it emails your team a short, plain-English brief each morning: visitors, signups, top sources and pages, and how the numbers moved. There's a full dashboard too, but most days the email is all you open. If you share links to promote your Webflow site, Muro Links track any link you send right through to the signup. We keep the product specifics on our analytics for Webflow page if you want them for your setup.
To be clear about what it is and isn't: Muro summarizes your own aggregate data. It won't tell you what to do next, and it doesn't replace Webflow's native form handling. It tells you, in plain language, what your traffic is doing, which is exactly what Webflow's built-in counts leave out.
How often should you check your Webflow analytics?
Once real analytics are running, the trap is the same one that catches every site owner: you set it up, check it obsessively for a week, then forget it exists.
For most Webflow sites, a weekly glance is plenty. Once a week, look at three things: did traffic move, where is it coming from, and did anyone convert. That ten-minute habit catches the launch that landed, the newsletter mention that spiked, or the quiet stretch that means it's time to promote again, without turning analytics into a daily worry.
The real risk isn't checking too little in a given week, it's the slow drift where "once a week" becomes "once a month" becomes never, right when something interesting is happening. A marketing site or portfolio is exactly the kind of thing that's easy to stop watching. That's the whole appeal of a tool that emails you a summary instead of waiting for you to visit: the update arrives whether or not you remembered to look.
Which analytics setup should you choose?
If you want a quick decision:
- Staying on Webflow's free Starter plan? You're limited to the built-in analytics. Fine for a simple site; upgrade when you need real numbers.
- On a paid Site plan and want depth plus a dashboard? Add Plausible or Fathom through custom code.
- Want the numbers without checking a dashboard? Add Muro and read the morning email instead.
- Running serious Google Ads? Keep Google Analytics for the ad attribution, and accept the consent-banner overhead that comes with it.
Whatever you pick, the install path is the same: paste one script into Webflow's Head Code and publish. The tool is the easy part; the important step is deciding to actually measure your site instead of guessing.
A quick word on Webflow's own analytics
It's fair to ask whether you need a third-party tool at all, given Webflow keeps expanding its first-party analytics. The honest answer is that it depends on how far Webflow's current offering goes on your plan and how much depth you need.
Webflow's native form capture is genuinely useful and worth using regardless. If Webflow's built-in traffic reporting happens to cover your questions on the plan you're on, there's no shame in starting there and adding a dedicated tool later. The reason most growing sites still reach for a separate tool is consistency and depth: an independent analytics tool gives you the same source-and-conversion view no matter which builder you're on, and it doesn't change underneath you when the platform reshuffles its features. Check what your Webflow plan includes today, then fill the gaps with a tool rather than assuming you need everything at once.
The honest bottom line
Webflow is a superb way to build a site, but its built-in analytics stop at basic counts, and for a site you're trying to grow, that's not enough to make good decisions. The fix is straightforward: on a paid Site plan, paste a single analytics script into Webflow's custom code Head field, publish, and suddenly you can see where visitors come from, what they read, and whether they convert.
If you want to keep the site as clean as Webflow lets you make it, reach for a cookieless, privacy-friendly tool so you skip the consent banner entirely. And if you'd rather not check yet another dashboard, try Muro free for 30 days: no credit card, no cookies, one line of script in your Webflow head, and a two-minute morning email instead of a tab you forget to open. If a dashboard suits you better, pick one of the other privacy-friendly tools. The point is to stop flying blind on a site you put real work into.