Next.js analytics: how to add privacy-friendly tracking (2026 guide)
Next.js has no built-in analytics because it's a framework, so you add a tool yourself: a script tag in app/layout.tsx (App Router) or pages/_app.tsx (Pages Router), or the tool's npm package. The key gotcha is client-side routing: Next.js navigates without full page reloads, so pick a tool that tracks route changes or you'll only ever record the first page. Cookieless, privacy-friendly tools (Plausible, Fathom, Muro) install in one line and need no consent banner.
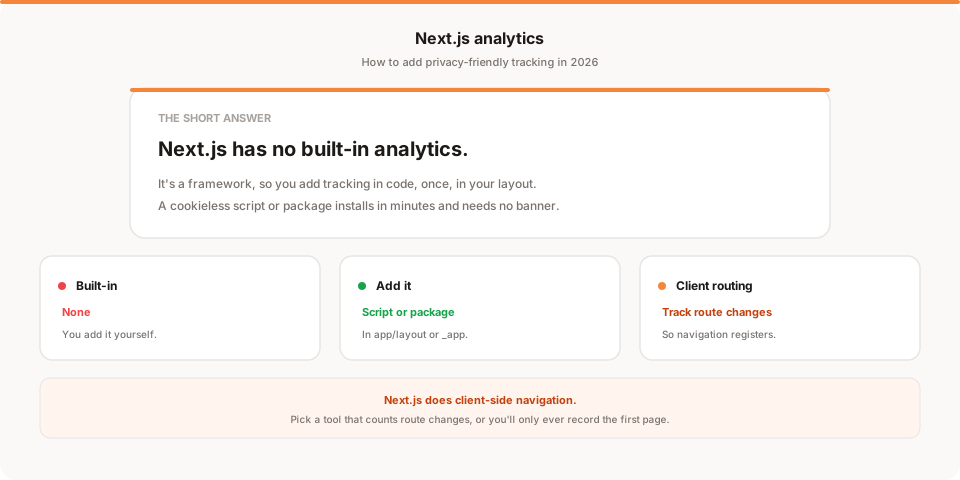
Short answer: Next.js has no built-in analytics because it's a framework, not a hosted platform. You add a tool yourself, either a script tag in your layout or an npm package, and the one thing you must get right is client-side routing: Next.js navigates without full page reloads, so you need a tool that tracks route changes or it'll only ever count the first page. This guide covers the setup for both routers, the gotcha, and which options are worth it.
If you've shipped a Next.js app and gone looking for an analytics tab, you already know it isn't there. That's not a gap in Next.js, it's just what a framework is: it gives you the building blocks and leaves the choices to you. Analytics is one of those choices, and it's a quick one once you know the pattern.
Quick disclosure: I'm the founder of Muro, a privacy-friendly analytics tool, so I have a stake here. This is a genuine how-to that works with any tool, and I've kept my own product to one honest mention near the end.
Does Next.js have built-in analytics?
No, and that's by design. Next.js is a React framework for building the app, not a hosting platform that watches your traffic.
There is one common point of confusion worth clearing up: Vercel Analytics. If you deploy your Next.js app on Vercel, Vercel offers its own Analytics and Speed Insights products, which are genuinely easy to switch on and are cookieless. But that's a Vercel feature, not a Next.js one, and it's deliberately lightweight, more about page counts and web-vitals performance than a full view of where your traffic comes from. So the honest answer is that Next.js itself ships nothing, and even the Vercel add-on only covers part of what most people mean by analytics.
Everything else, traffic sources, top pages, conversions, is something you add.
The one thing that trips everyone up: client-side routing
Before the setup, the single most important concept, because it's why so many Next.js analytics setups silently undercount.
Next.js does client-side navigation. The first page loads normally, but after that, moving between routes swaps the content in place without a full browser reload. A naive analytics script fires its pageview once, on that first load, and then never again, so your dashboard shows one page per visit no matter how much someone clicks around.
The fix is to use a tool that tracks route changes. In the App Router that means the tool hooks into navigation events; in the Pages Router it listens to router.events, specifically routeChangeComplete, and fires a pageview each time. Most privacy-friendly analytics tools handle this automatically once installed, which is a good reason to use one rather than rolling your own. Just verify it in practice: click around your live app and confirm the pageviews increment.
How to add analytics in the App Router
For an App Router app (the app/ directory), you add the tracking to your root layout so it loads on every route.
The two common approaches:
- The tool's npm package. Many analytics tools ship a small React component or package with Next.js support. You install it and render its component inside
app/layout.tsx, and it handles route-change tracking for you. This is usually the cleanest path. - A script tag via
next/script. Import theScriptcomponent fromnext/scriptand add the tool's snippet to your root layout withstrategy="afterInteractive"so it loads without blocking the page. Pair it with the tool's route-change support so navigation is counted.
Either way, because the root layout wraps every route, you install once and every page is covered.
How to add analytics in the Pages Router
For a Pages Router app (the pages/ directory), the equivalent home is pages/_app.tsx, which wraps every page.
Add the tool's script or component there so it loads globally. Then, to handle client-side navigation, hook into the router: subscribe to router.events and fire a pageview on routeChangeComplete, remembering to clean up the listener when the component unmounts. Many tools do this for you once their package is installed, but if you're adding a raw snippet, this is the piece that turns a one-pageview setup into an accurate one. The pattern is well documented for every major analytics tool, so follow your tool's Next.js guide rather than improvising.
Which analytics option should you use?
You've got a few real choices, and they trade off privacy, depth, and effort.
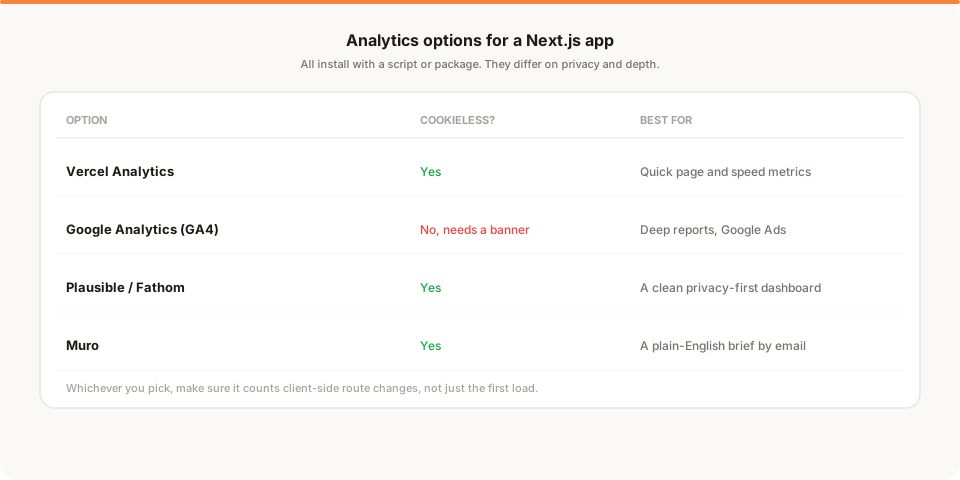
- Vercel Analytics is the easiest if you're on Vercel and mostly want page counts and performance data. Cookieless, but light on traffic-source detail.
- Google Analytics (GA4) is free and deep, with native Google Ads attribution, but it uses cookies and generally needs a consent banner in the EU. If you're weighing whether it's worth that overhead, the best Google Analytics alternatives lays out the trade.
- Plausible or Fathom give you a clean, privacy-first dashboard with no banner, which suits most Next.js projects.
- Muro is the option if you'd rather not open a dashboard at all, and get a plain-English summary by email instead.
I went through the whole privacy-friendly category, including self-hosted options like Umami and Matomo (a common pick for developers, hence all the "matomo nextjs" searches), in the best privacy-friendly analytics tools for 2026.
Tracking conversions in Next.js
Page counts are the start; conversions are the point. In a Next.js app you have two clean ways to track them.
The simplest is the thank-you route: after a signup or purchase, send the user to a dedicated success page (for example /welcome or /thank-you) and count views of that route as conversions in your analytics tool. Because that pageview carries the traffic source, you can trace a signup back to the channel that produced it. The alternative is a custom event: most tools expose a function you call when a key action happens, such as a form submit or a checkout completion. Events are more flexible, the thank-you route is simpler to reason about, and either one is far better than not tracking conversions at all.
Why your Next.js numbers won't match other tools
If you run two tools side by side, expect them to disagree. That's normal, not a bug.
Google Analytics uses cookies and loses data when EU visitors reject the banner, so it often reports fewer visitors than a cookieless tool that counts everyone. Route-change tracking can also be configured slightly differently between tools, which shifts pageview totals. And bot filtering varies. So a 10 to 30 percent gap between any two tools is common. Rather than reconciling exact numbers, pick one as your source of truth and watch the trend inside it.
How Muro fits with Next.js
Softly and honestly: Muro is one of the privacy-friendly tools you can add to a Next.js app, and it's built for developers who'd rather not babysit a dashboard.
You add it once in your layout, it tracks client-side route changes, it uses no cookies, and in most contexts it needs no consent banner. Instead of a dashboard you have to remember to open, it emails your team a short, plain-English brief each morning: visitors, signups, top sources and pages, and how the numbers moved. There's a full dashboard too when you want to dig in. We keep the setup details on our analytics for Next.js page.
To be clear about what it is and isn't: Muro summarizes your own aggregate data. It won't tell you what to do next, and it isn't an error monitor or a performance tool. It tells you, in plain language, what your traffic is doing, so a real change is easy to notice the next morning.
Common Next.js analytics mistakes
A handful of mistakes account for most broken Next.js analytics setups, so check yours against them.
The big one, again, is forgetting route-change tracking. Without it you record the first page and nothing else, and your reports quietly lie about how people use your app. The second is the wrong script strategy: if you inline a raw analytics tag or load it with beforeInteractive, you can block rendering and hurt your Core Web Vitals, which is a shame on a framework built for speed. Use next/script with afterInteractive, or the tool's own package. The third is double counting in development, because React Strict Mode intentionally double-invokes effects in dev, so a naive pageview effect fires twice; always verify your counts in a production build, not in next dev. The fourth is trying to fire tracking from a server component, when analytics is a client concern, so the pageview logic has to live in a client component or the tool's package.
None of these are hard, but each one silently corrupts your data in a way that's easy to miss because the app still works. A five-minute check of all four right after you install saves you from trusting months of subtly wrong numbers.
A concrete pattern for the App Router
To make this less abstract, here's the shape of a clean App Router setup.
You create a small client component whose only job is analytics. It reads the current route with usePathname, and, if you care about query strings, useSearchParams, and it fires a pageview inside an effect whenever those values change. You render that component once in your root app/layout.tsx, so it wraps every route and re-runs on each client-side navigation. Separately, the analytics script or package loads through next/script with the afterInteractive strategy, or through the tool's own component, so it never blocks the first paint.
The reason this pattern works is that it cleanly separates two jobs: loading the script once, and firing a pageview on every route change. Get both and your data is accurate; miss the second and you're back to one pageview per visit. The good news is that most privacy-friendly tools wrap both jobs into a single drop-in component with a documented Next.js guide, so you rarely have to wire this up by hand. But even when you do, this is the shape to aim for, and it's a ten-minute job rather than an afternoon.
Self-hosted or a hosted tool?
Developers often ask whether to self-host analytics instead of paying for a hosted tool, and the popular "matomo nextjs" route is exactly this question. Self-hosting Matomo, Umami, or Plausible's open-source edition is free of subscription cost and gives you full data ownership, which some teams genuinely need. The catch is that "free" means you now run a service, with a database, updates, uptime, and backups, and that time usually costs more than a small monthly fee. The honest rule of thumb: self-host when data ownership is a hard requirement or you already run infrastructure and enjoy it; otherwise a hosted cookieless tool is less total work. Either way, the Next.js integration is identical, a script or package plus route-change tracking, so you can start hosted and move to self-hosted later without changing how your app is instrumented.
The honest bottom line
Next.js ships no analytics because it's a framework, so the job is yours, and it's a small one. Add a tool in app/layout.tsx or pages/_app.tsx, make sure it tracks client-side route changes, and you'll have an accurate picture of your traffic in an afternoon. Skip that route-change step and you'll have a report that swears every visitor saw exactly one page.
For most Next.js projects, a cookieless, privacy-friendly tool is the cleanest fit: one install, no banner, no compliance headache. And if you'd rather read a two-minute email than open a dashboard, try Muro free for 30 days: no credit card, no cookies, and a setup built for Next.js routing. If a dashboard suits you better, Plausible and Fathom are excellent. The point is to stop shipping features into the dark and start seeing who actually uses them.