How to track button clicks without code (Webflow, Framer, Carrd, WordPress)
You can track button clicks without Google Tag Manager by adding a data attribute to the button and letting your analytics script listen for clicks on it. In Webflow, that's a custom attribute in Element settings. In Framer, it takes a short code override. In Carrd, attributes need Pro Plus, or an Embed on Pro Standard. In WordPress, use a Custom HTML block or a page builder's attributes field. Clicks are only counted from the day you add the attribute.
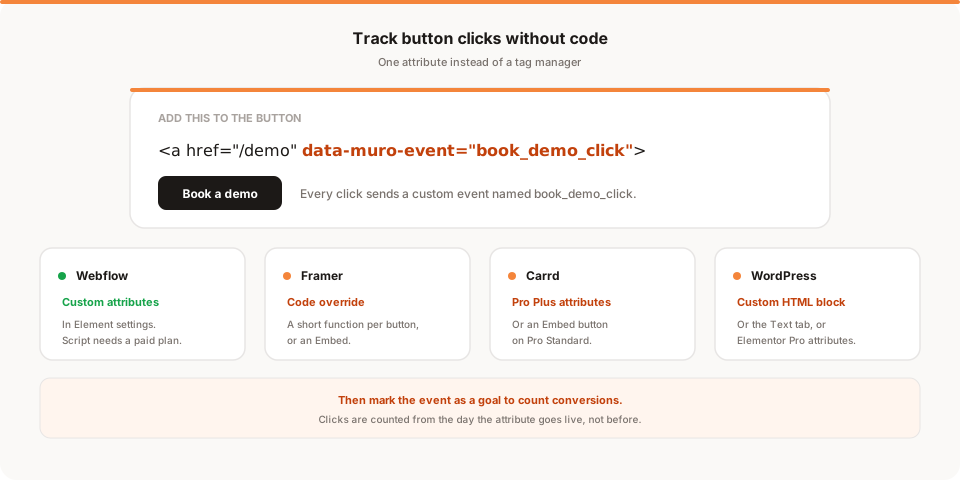
Short answer: add a data attribute to the button, like
data-muro-event="book_demo_click", and your analytics script counts every click on it. No Google Tag Manager, no triggers, no JavaScript. Webflow has a field for it, WordPress and Carrd need a small workaround depending on your setup and plan, and Framer takes a short code override.
I build Muro, so the examples use Muro's attribute. Weigh that. The platform steps are checked against each platform's own help docs in November 2026, and the same ideas carry over to Plausible and Fathom, which I cover near the end.
The usual way: Google Tag Manager and GA4 events
If you've searched this before, you've seen the standard recipe:
- Install Google Tag Manager next to GA4.
- Turn on the built-in click variables.
- Create a click trigger, usually "All Elements" or "Just Links," with a condition that matches your button by its text, ID or class.
- Create a GA4 event tag that fires on that trigger.
- Test in Preview mode, then publish the container.
- In GA4, mark the event as a key event if you want it as a conversion.
It works, and for a big site with a dedicated analytics person it's the right tool. For a ten-page Webflow site, it's a lot. You're running a second script, learning a second interface, and your tracking depends on button text or class names that change the next time someone redesigns the page. And in GA4, a key event only counts from the day you mark it, which I wrote about in retroactive goals explained.
The attribute approach
The lighter idea: mark the button in your HTML, and let the analytics script do the listening.
<a href="/demo" data-muro-event="book_demo_click">Book a demo</a>
With the Muro script on the page, a click on that element, or on anything inside it like an icon or a span, sends a custom event named book_demo_click. A few things worth knowing:
- It works on elements added to the page later, and on every route of a single-page app.
- It never changes your page. It only reads the attribute.
- If tagged elements are nested, the closest one to the click wins, so one click sends one event.
- If the same button appears twice and both should count together, give them the same name.
Pageviews are tracked on their own. Clicks are not. This attribute is how you opt a button in.
Everything below assumes the Muro script is already on your site. The per-platform install guides are on our pages for Webflow, Framer, Carrd and WordPress.
Webflow
Webflow has a native field for this, which makes it the easiest of the four.
- In the Designer, select the button or link.
- Open the Element settings panel.
- Find Custom attributes and click the plus icon.
- Name:
data-muro-event. Value: your event name, for examplebook_demo_click. - Publish the site.
Webflow's help docs describe this panel and note that a few attributes are reserved because Webflow already handles them natively (you can't add href this way, for example). data- attributes aren't among those.
The plan part: the attribute itself is free to add, but the analytics script needs custom code in your site's head. Webflow's help center says custom code is available if you have a Core, Growth, Agency or Freelancer Workspace, or an active Site plan. On a free site, the script can't load, so the attribute does nothing.
Framer
Here I have to be straight with you: I couldn't find a native custom attributes field for elements in Framer's help docs, and analytics vendors that document Framer setups (Pirsch and Seline, for example) all use a code override to add a data- attribute. Pirsch's guide also notes that Framer only accepts attributes that start with data- or are regular HTML attributes like id, which is fine for us.
It's a few minutes of copy and paste, not real coding:
- Select the button you want to track.
- In the right-side panel, scroll to Code Overrides. Choose File, then New file...
- Name the file, keep New override selected, and click Create.
- Replace the sample code with this:
import type { ComponentType } from "react"

export function withBookDemoClick(Component): ComponentType {
    return (props) => <Component {...props} data-muro-event="book_demo_click" />
}
- Back on the button, pick that file and the
withBookDemoClickoverride. - Publish, then test on the live URL. Framer's site-wide custom code (where the Muro script lives) only runs on the published site, not in the editor preview.
For each extra button, add another function to the same file with a different name and event. It's more effort than Webflow's field, but you only do it once per button.
The alternative: drop an Embed on the page with your own HTML button that carries the attribute. That's simpler code but you lose Framer's styling and interactions on that button, so I'd only do it for something like a plain download link.
The plan part: you still need the Muro script in Framer's site-wide custom code (Project Settings, Custom Code). Framer's help article on custom code doesn't name a plan, and Framer's pricing page doesn't list it either. Install guides from several vendors say custom head code only runs on paid site plans. Check your plan before you start.
Carrd
Carrd is a two-path answer, and it depends on your Pro tier. Prices below are approximate, from Carrd's pricing page in November 2026, so check their site.
On Pro Plus (around $49 a year): Carrd's Advanced Settings let you "add custom HTML attributes to elements." Select the element and open its Settings tab. Add data-muro-event with your event name.
Two honest caveats. Carrd's doc doesn't spell out the exact field layout, so the labels may differ slightly from what I describe. And a Carrd Buttons element can hold several buttons. If the attribute lands on the whole element, every button inside it sends the same event name. If you need them separate, put the button you care about in its own Buttons element.
Pro Plus also gives you Events in the same Settings tab, including On Click per button, which runs custom JavaScript. If you'd rather not deal with the attribute, put this in a button's On Click:
window.muro?.track("book_demo_click");
On Pro Standard (around $19 a year): no attributes, but you do get the Embed element. Add an Embed, set Type to Code, Style to Inline, and paste your own button:
<a href="/demo" data-muro-event="book_demo_click"
   style="display:inline-block;padding:12px 20px;background:#111;color:#fff;border-radius:8px;text-decoration:none">
  Book a demo
</a>
You style it yourself, and Carrd's docs say embeds don't output anything in the builder, so publish to see it.
On Pro Lite or free: Carrd doesn't allow custom code there, so you can't load an analytics script at all. That's a hard stop.
WordPress
WordPress has more ways in, and one trap.
Block editor, Custom HTML block (most reliable). Add a block, type /html, and choose Custom HTML. Click Edit HTML, paste your button, and update:
<div class="wp-block-button">
  <a class="wp-block-button__link wp-element-button" href="/demo" data-muro-event="book_demo_click">Book a demo</a>
</div>
Using the theme's button classes keeps it looking like your other buttons in most block themes. Note that in WordPress 7.0, users without the unfiltered_html capability (Contributors, for example) have their Custom HTML sanitized, so do this as an Editor or Admin.
Block editor, editing a Button block as HTML. You can open a block's options and choose Edit as HTML, then add the attribute. The trap: core blocks check their own markup, and adding attributes this way can trigger "This block contains unexpected or invalid content," and recovering the block can strip your change. Use the Custom HTML block instead.
Classic editor. Switch from Visual to the Text tab and add data-muro-event="book_demo_click" to the link or button tag.
Page builders. Elementor Pro has a custom Attributes field on the Advanced tab for widgets, sections and columns, where you enter data-muro-event|book_demo_click (name and value separated by a pipe). Elementor's newer V4 editor moves it to the General tab. It's a Pro feature, not in free Elementor. I haven't verified other builders, so check yours for an "attributes" field.
Plain HTML and React
Plain HTML is the easy case:
<button type="button" data-muro-event="pricing_toggle_annual">Annual</button>
In React or Next.js, write the attribute the same way in JSX:
<a href="/signup" data-muro-event="hero_signup_click">Start free trial</a>
If the clickable thing is a component like <Button>, make sure the attribute reaches the real HTML element. Most UI libraries pass data-* props through. If yours doesn't, put the attribute on a wrapper.
Turn the click into a goal
A click event on its own shows up in the Custom Events panel. To count it as a conversion, hover it there and click Mark as goal. That creates a custom event goal, and the Goals panel shows its conversions, conversion rate and trend, with breakdowns by source, page, country, device and UTM campaign.
If you'd rather set the goal before the first click, use Track an event in the Custom Events panel. It gives you the attribute to paste and lets you save the goal straight away. The first-hit watcher shows "Waiting for the first hit" until a click arrives, then confirms it. That's your proof the attribute is live. Click your own button on the published site, and you should see it within about a minute.
Naming tips
- Lowercase, words joined with
_or-.book_demo_click, notBook Demo. Names are case-sensitive, soSignupandsignupare two different events. - Name what happened.
pricing_cta_clickreads better in six months thanblue_button_2. - Same action, same name. A "Start trial" button in the header and the footer can share one name if you want one number.
- Clicks aren't completions. "Sign up" clicks include people who then abandon the form. For completed signups, send people to a thank-you page and make that a page goal, or call
muro.track()from code once the signup succeeds.
Limits worth knowing
- No properties through the attribute. The attribute sends a name, nothing else. For details like a plan name, use
muro.track("checkout_started", { plan: "pro" })from code. - No history before the attribute. Clicks are only counted from when the attribute went live. A goal on that event can't reach back further. Page goals can, because pageviews are always recorded.
- Not automatic. Muro doesn't record every click on its own. If a button isn't tagged, its clicks aren't counted.
- No identities. You see how many clicks and from which sources, not who clicked.
How Plausible and Fathom do it
Fair is fair: Muro isn't the only tool with no-code clicks.
Plausible uses a CSS class. Their custom event goals docs show class="plausible-event-name=Button+Click", where + stands for a space and the goal you create in Plausible is "Button Click." On WordPress they suggest the block's Additional CSS class(es) field, which is a real advantage: no Custom HTML block needed. On Webflow they recommend a double dash (plausible-event-name--Signup) because Webflow may replace the =. They also note past events aren't backfilled into a new goal.
Fathom documents click tracking with a small inline handler, like onclick="fathom.trackEvent('button click')", in their link clicks guide. It's one line, but it is JavaScript, and I couldn't find a class or attribute-only option in their docs.
| Muro | Plausible | Fathom | GTM + GA4 | |
|---|---|---|---|---|
| How you mark a button | data-muro-event attribute | plausible-event-name= class | onclick with trackEvent | Trigger matching text, ID or class |
| JavaScript needed | No | No | One line | No, but a tag manager |
| WordPress Additional CSS class field works | No | Yes | No | Depends on trigger |
| Extra details (properties) | Via muro.track() from code | Check their docs | _value only | Yes, event parameters |
The bottom line
You don't need a tag manager to count a button. One attribute does it. Webflow makes it a two-minute job, WordPress works best through a Custom HTML block or Elementor Pro, Carrd needs Pro Plus for attributes (or an Embed on Pro Standard), and Framer takes a short code override.
Whatever tool you use, tag the buttons you care about early, because nobody can count clicks from before the tag existed.
If you want to try it with Muro, there's a free 30-day trial, no credit card. Install the script, tag one button, and watch the first hit come in.